VirtualMV/Flash12 (CS6)/Journal/Content/Journal Navigation
Contents
Introduction
By the end of these exercises you should be able to:
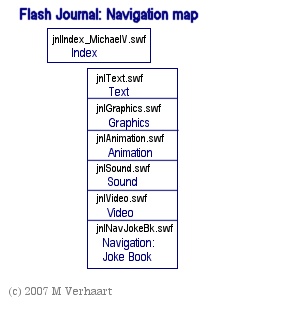
This short tutorial illustrates how to link multiple Flash Movies to a Main Movie to allow multiple developers to work on an application or keep the flash Movies small in size for web downloading. (Reinhardt & Dowd, 2007)[1] |
Design
Build template
1. Create a new Flash document: jnlIndex_<name> e.g. jnlIndex_MichaelV
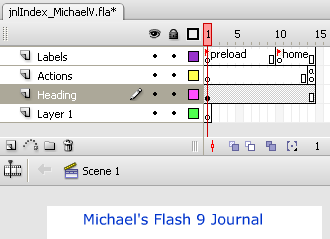
2. Add the Labels Layer with labels: Preload(Frame1, Frame span 1-9), Home(10, 10-14)
Note that you could do this in 2 frames Preload (Frame 1) and Home(Frame 2), but I have expanded them so that you can read the labels.
3. Add an Actions Layers. Add a stop command to Frame 14. (Insert Keyframe, [F9], Global > Timeline > stop )
4. Add a Heading layer and add the text "<your name>'s Flash 9 Journal"
Your movie should look like
Add the button to link the Text swf file
In previous chapters we have created a series of flash documents and published them to create SWF files. The first one jnlText.fla (and associated jnlText.swf) demonstrated some text features. In this exercise we will link to the jnlText.swf.
1. Add a button layer called TextBtn
2. Add a folder layer called Buttons (so that we can organise the buttons)
3. Drag the TxtBtn layer into the Button Folder
Create a button to link an external swf file
4. Now, insert a Button (Windows>Common Libraries > Buttons)
5. Change the text on the button to Text. (Double click the button, and you may have to unlock the text layer)
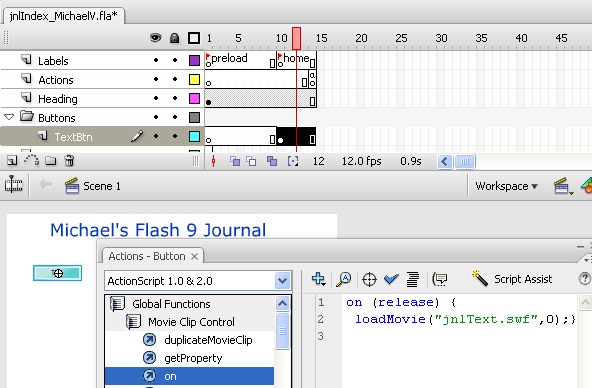
6. Clear Frames 1-9 of the TextBtn Layer.
7. With the Selection Tool enabled, select the text button ON the stage
8. Press [F9] To add an action to the button (Look at the Tab at the bottom of the code area it will tell you that you are creating an action for the button)
9. Using ActionScript 1.0 & 2.0 > Global Functions > Movie Clip Control, add the on | release action
on (release) {}
10. Using Global Functions > Browser/Network, add the loadMovie command inside the {}, and type in the filename
loadMovie("jnlText.swf",0);
Your movie should look like
The File name is a URL and the 0 is the target scene. By default, 0 is the scene used by the first (or root) movie, so we are replacing the current movie (jnlIndex) with the text movie (jnlText).
And that’s pretty much all there is to it!!
11. So, save and test your Movie.
Task: Link all your swf Journal Files
1. Your next task is to add a [Home] button to the jnlText.swf document, to loadMovie jnlIndex.swf.
Once you have this working
2. Link up all of your swf Journal Files into one application.
Linking through an exe player
If you want your Flash Movie to play without a browser (so you can supply it on a CD/DVD). Compile jnlText.swf as an exe file (use Publish settings).
Now when you want to run the movie without a browser run jnlIndex.exe which links to the swf files (eg. jnlText.swf). In the swf files (e.g. jnlText.swf) this will link back to jnlIndex.swf (so this needs to be available as well as jnlIndex.exe )
Cite error: <ref> tags exist, but no <references/> tag was found


