VirtualMV/Flash12 (CS6)/Basic/Audio/Content
Contents
Overview
Introduction
“Sound is perhaps the most sensuous element of multimedia. It is meaningful "Speech" in any language from a whisper to a scream. It can provide the listening pleasure of music, the startling accent of special effects, or the ambience of a mood-setting background. How you use the power of sound can make the difference between an ordinary multimedia presentation and a professionally spectacular one.” Vaughan (1993)[1]
Compatible file types
The two main sound file formats imported into Flash are;
- MP3 (MPEG-1 Audio Layer 3). A highly compressed and portable (both PC and Mac).
- WAV. Designed for Windows, has been a standard since Windows 95.
Others available include;
- AIFF or AIF (Audio Interchange Format), Sun AU, QuickTime and Sound Designer II
Reinhardt and Dowd (2007)[2] discuss each format in detail
Windows Media Audio (wma)
A real problem is using wma files. Windows Movie Maker (and I think Sound Recorder) from Windows 7 create only wma files, which are unfortunately not supported by Fash. So they need to be converted first. Some programs you can download and install to perform the conversion are
- Free WMA to MP3 Converter and
- Note: The following are promotionware programs and try to install browser addins - which are nearly impossible to remove, so uncheck all the optional programs.
- Switch MP3 Converter Software
- Ashampoo Music Studio 2009 for FREE!! Keep an eye on the PC Magazines in the supermarket - they often have the full version of this available.
- According to Linder (2008) [3] you can get an import/export feature in Audacity if you add a plugin FFmpeg.
Editing sound in Flash
Once imported into Flash sound files can be edited, then saved in various formats when your flash file is published. Two formats are recommended;
- MP3 (MPEG-1 Audio Layer 3).
- Speech (Nellymoser). A specialized codec designed specifically to handle voice recording. It eliminates much of the tinny-ness that you get when compressing the human voice.
Create a new Flash document
1. Create new flash document (will be called jnlSound.fla)
2. Just in case someone has played around in Flash before, reset the layout to the default one.
Select Window > Workspace > Classic/Reset 'Classic' .
3. Add a layer called Title and add the text Sound journal
Source a sound file
4. In the Windows/Media folder on your system, choose one of the sound files (approx 200K), and copy into your journal folder. (you can use the search function in Windows Explorer- right click the Windows folder (usually C:\windows) and search for *.wav files). For the following example I will use the XP Startup file which I have renamed to XPStartup.wav.
Import into the library
Flash does not import a sound into the timeline, instead it manages the file by placing it into its library. The Library panel allows you to place assets (media objects) into it and then the flash movie can access the sound clip. This means that the sound file is loaded only once into a Flash movie and then if required more than once is played from the library. This obviously makes using the sound much more efficient and keeps the movie size down to a minimum as sound files can be quite large.
Note that when playing a movie Flash loads the entire sound file into the computers Memory, so if you have large sound files and low memory on your PC this can cause hardware problems.
Sound can be imported into the library in two ways.
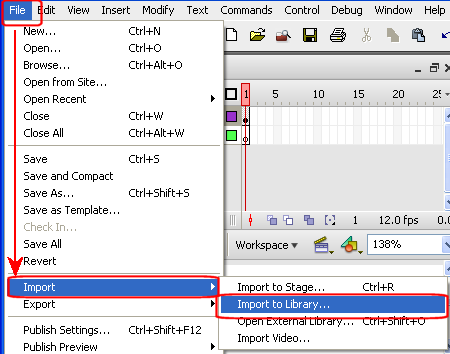
- Use File > Import > Import to Library or
- If Windows Explorer is open drag the file into the Library panel. (This can be very useful if you have used Windows Explorer’s Search tool and have the file name displayed.)
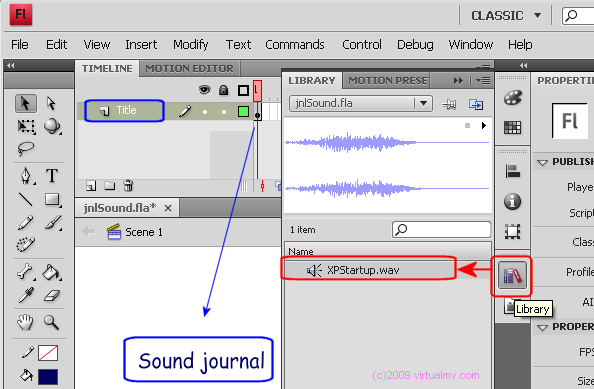
5. In the Windows/Media folder on your system, choose one of the sound files (approx 200K), and copy into your journal folder. For the following example I will use the XP Startup file which I have renamed to XPStartup.wav.
6. Load it into the Library. Your Flash environment should be similar to that shown...
Creating background sound
Sound is generally placed in two different ways;
- As a background or
- On buttons
To introduce you to sound we will look at placing sound as a background
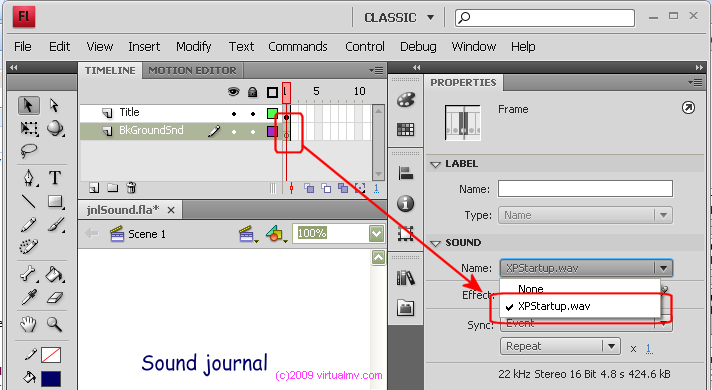
7. Create a new Layer (or rename Layer 1) to BkgroundSnd
8. Click on Frame 1 of BkgroundSnd
9. In the Properties pane, Click on the Sound drop box. A list containing “None” and your sound clip should be displayed, choose your sound clip.
Your stage should resemble that shown ..
10. Test your movie ([Ctrl]+[Enter])
11. Explore some sound effects using the Effects, or the Sync options.
Editing the sound
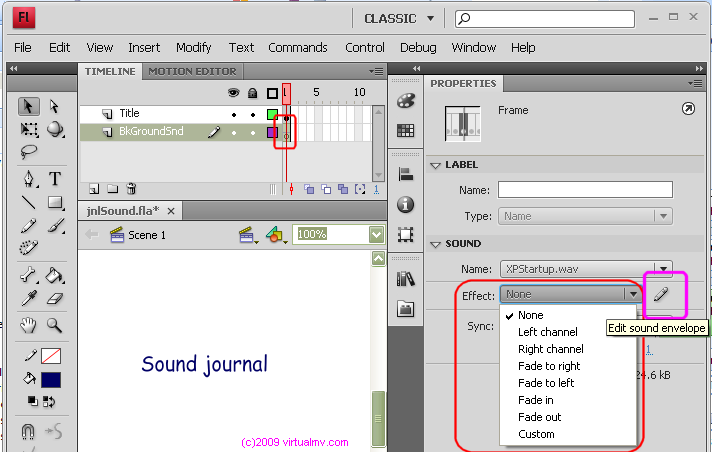
You can add some basic effects to the sound file such as Fade in, Fade out using the effects drop box.
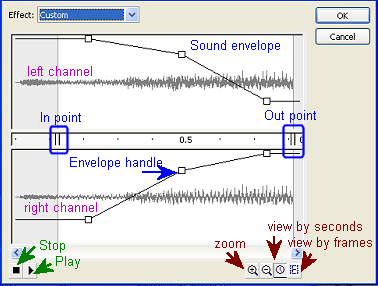
Flash also has a basic built in sound editor. This is accessed by clicking on the frame that contains the sound (as the sound can exist in many places), and in the Property inspector click the pencil next to the Effect Drop box.
With it you can select at what point you want the sound to start (in point) and what point you want the sound top stop (outpoint). You can also change the sounds volume using the sound envelope. These are the lines drawn on the sounds and you can adjust the sound volume by dragging the existing handles, or clicking on the line to create a new handle and dragging them.
Save, Test and Publish your document
Save and publish this document as jnlSound.fla
Task: Add some more sounds
1. Use Windows Sound recorder to create an original sound, and replace the “borrowed” sound.
Cite error: <ref> tags exist, but no <references/> tag was found
