User:Acorrales/Scratch Introduction
Contents
Introduction Guide to Scratch
This is a basic guide to using Scratch, a programing language. It will guide you through setting up a project and give you tips and suggestions that will help you get started. It is important to note that this is only a basic interpretation of instructions to the program Scratch. If there are any questions beyond this basic introduction guide there is a huge community on Scratch website with a full set of resources that I encourage you to dive into. That been said let us start the introduction.
Scratch is a virtual MIT partner which is a design based program that introduces computer programing for all ages. It is community based and incorporates teamwork through communication around the web. It utilizes the same type of fundamentals that you would find in basic programing. It applies common terminology as well as the structure form outline as basic programing entails. With this programing language, Scratch, you can create games, art, music, stories, and animations. And due to its community based structure you can modify and alter programs that are shred with the community.
Interface
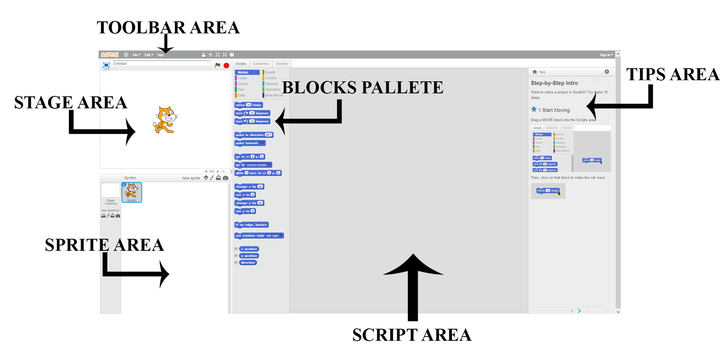
The interface is made up of five main sections:
THE TOOLBAR AREA
- The TOOLBAR AREA is located at the top and offers quick access to some functions. It also is a file manager and is where you can save and create new projects. If you hover your pointer over the shortcut functions, they will display a brief descriptive word about their functionality.
THE STAGE
- The STAGE is located on the Upper left hand corner and is where you can preview your project live as you work on it. The stage’s width is 480 units and its height is 360 units. If you place your courser anywhere on the stage you can see the X and Y coordinates at the bottom right side of the stage area.
THE SPRITE AREA
- The SPRITE AREA is located in the lower left corner. In this area you can import and upload images as well as create them to form a list of sprites. A sprite is basically a graphic that can be manipulated on the screen by a set of codes. You can alter the sprites by utilizing the tabs above the BLOCKS PALLETE and editing their options.
THE BLOCKS PALLETE
- The BLOCKS PALLETE is located between the THE STAGE AREA and the THE SCRIPT AREA. This section contains tabs that allow you to edit and modify your sprites.
THE SCRIPT AREA
- The SCRIPT AREA is located in the right and is where you can drag blocks into. Theses’ blocks are located in the BLOCKS PALLETE under the tab SCRIPT in the middle section of the screen. Blocks are commands that when combine create a function. By clicking on the block you can view there action on the sprite in the STAGE AREA.
This BLOCKS PALLETE sections contain tab that help edit your project:
THE SCRIPT TAB
- The SCRIPT TAB contains blocks of prewritten codes that allows you to alter the function of a sprite. This section categorizes and color codes the blocks by object functionality. By dragging these blocks on to the SCRIPT AREA you can manipulate your sprite and create a number of functions that create a game, story, or art.
THE COSTUMES TAB
- The COSTUMES TAB contains an editor where you can import, modify, and create images or texts for your sprite. Through this section you can add images or create images that can add animation to your sprite via scripting. As you add a new costume you can rename the costume and call to it from the script area.
THE SOUND TAB
- The SOUND TAB contains an editor where you can import, modify, and create sound for your project. Through this section you can add or create sound that can add an extra layer of interaction with the user via scripting. As you add a new sound you can rename it and call to it from the script area. In this section you can also preview your sound and add pre-existing effects to your audio, such as fade-in and fade-out effects.
Creating a project
Creating a project is simple and easy to do. All you need to do is click on the create icon at the top of the website and it will load the interface of Scratch. You can also create a new project from the toolbar section under the file tab.
Creating a sprite
You can create a sprite by clicking on the folder icon in the SPRITE AREA. You can also duplicate or delete your sprites by clicking the right mouse button when you hover over your sprite. If you hover your mouse pointer over the new sprite icons they will display a brief descriptive word on their functionality.
Programing a sprite
To program a sprite all you need to do is drag a block from the BLOCKS PALLETE onto the SCRIPT AREA. To see how to block functions in the STAGE AREA all you need to do is click on the block.
You can also snap blocks together into piles. To see how these blocks work together click anywhere on the pile and the script will run in the STAGE AREA.
If you click on the question mark in the TOOLBAR section and then click on a block, a help section will open and describe the function and uses for said block.
We come to a close in our brief introduction guide to Scratch programming. If you have any questions please take a look in the help section of the program. In the TOOLBAR section you can click on the tips tap and find a new section that appears and contains helpful information about getting started, how to tutorials, and in-depth descriptions of blocks.
Here is a log of my time I spent on this project: Time Log
