To Light or Not to Light
| Instant wiki maker | Making handouts | Editing tips |
Contents
- 1 To Light ot Not to Light
- 1.1 Student worthiness
- 1.2 Primary biological content area covered
- 1.3 Materials
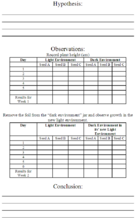
- 1.4 Handouts
- 1.5 Description of activity
- 1.6 Lesson plan
- 1.7 Potential pitfalls
- 1.8 Math connections
- 1.9 Literature connections
- 1.10 Connections to educational standards
- 1.11 Next steps
- 1.12 Citations and links
- 1.13 Reflections
Biology In Elementary Schools is a Saint Michael's College student project from a course that ran between 2007 and 2010 and fully described in this book chapter. The student-created resources have been preserved here for posterity. Link under 'toolbox' for printer-friendly versions of the exercises. Click on handouts to print full resolution versions. Please see Wikieducator's disclaimer, our safety statement, and the Creative Commons licensing in English and in legalese.
To Light ot Not to Light
Student worthiness
This experiment is in the process of being tested.
Primary biological content area covered
Students will be exposed to:
- plant growth
- the process of photosynthesis
Materials
Materials for the Teacher's Use
- watering can
Materials Required for Student Groups
- two jars (for each group)
- potting soil
- foil
- 4 beans (for each group)
- paper (to line the inside of the jars)
- Water
Materials Required for Individual Students
Handouts
|
|
Description of activity
In this activity, students will examine how the living environments(light & dark) affect the growth of green beans through photosynthesis. Through using scientific method, students will choose which situation is better for plant growth and then record and analyze their results once the seeds begin to grow.
Lesson plan
- Before beginning the activity in the classroom, soak the seeds overnight(optional)
- Take two jars and line the insides with paper.
- Take one jar and wrap it with aluminum(this will be your dark environment).
- Fill the jars with soil.
- Take the jars and fill them with a small amount of water(to moisten the soil).
- Plant three seeds into each jar(label each seed).
- Place one container in a dark area and the other in a bright area.
- Have the students predict which environment will make the seeds grow faster(hypothesis).
- The seeds will be left in their environements for a week, with the students watering the jars each day.
- Once the week is over, take the two jars and compare the size of seed growth.
- Have the students record what they see and whether or not their predictions were correct.
- To conclude the lesson, have a classroom discussion about photosynthesis(definition) and why the experiment turned out the way it did.
SECOND PART: Place the seeds from the dark environment and place them in the bright area overnight. The next day, students will record any changes.
Potential pitfalls
- Beans may not grow in either jar
- Beans may take a long period of time to grow
- If too much water is added to the beans the jars may grow a lot of mold
Math connections
There are many math connections to this activity. For example, you can have the children measure the growth of their plants each day. Then you can have them record this information in a table and use the table to create a class graph. The class graph also becomes an excellent visual aide.
Literature connections
- Jack and the Beanstalk by Steven Kellogg
- Growing Things by Carolyn Scrace
- Get Growing!: Exciting Indoor Plant Projects for Kids by Lois Walker
- Harvey the Gardener by Lars Klinting
- A Harvest of Color: Growing a Vegetable Garden by Melanie Eclare
- Growing Vegetable Soup by Lois Ehlert
Connections to educational standards
- 7.1 Scientific Method aa: Frame questions in a way that distinguishes causes and effects, identify variables that influence the situation and can be controlled.
- 7.1 Scientific Method ii: Work individually and in teams to collect, share, and present information and ideas.
- 7.15 The Universe, Earth, and the Enviornment cc: Identify, record, model, and explain the interrelated parts and connections between earth systems (e.g. crustal plates and land forms, atmosphere, water cycles, weather, and oceans.)
Next steps
- Students can remove the aluminum foil from the plant and see if the results change.
- For a similar experiment, students can cover the leaves of a plant with construction paper and observe what happens to the covered leaves.
- During the experiment the teacher should explain to students the importance of essential nutrients to plants. The class can also learn the parts of the plant as their plant grows.
Citations and links
| Work in progress, expect frequent changes. Help and feedback is welcome. See discussion page. |
Reflections
The experiment on plant growth was successful. The students were able to identify what kind of living conditions it takes for seeds to grow. They enjoyed the opportunity to keep the jars with the seeds so that they could record the plant growth in the following weeks. The students used the scientific process to hypothesise the conditions needed for plant growth. They were excited to see if their predictions were correct. The students had a great time playing with dirt. They also very excited that they were able to keep the plants and watch them grow for weeks. Also, they learned a lot about what a plant needs to grow.

