Chapter1

From WikiEducator
Jump to: navigation, search
Road Works.svg Work in progress, expect frequent changes. Help and feedback is welcome. See discussion page. Road Works.svg
Home.png
Computer Education Grade2h.png Grade Two
100
1.Starting Graphics
2. Drawing Lines
3. Curved Lines
4. Drowing Shapes
5. Using Colors
6. Grouping
7. Drawing Details
Printout copy Chapter One


Starting Graphics

To create pictures shapes or lines using the computer you can use a paint or draw program
Every draw program has drawing tools in a toolbox
You use the mouse to control the tools:

  1. Point
  2. Click
  3. Double-Click
  4. Drag
  5. White space or canvas is the blank area on the screen where you draw or paint

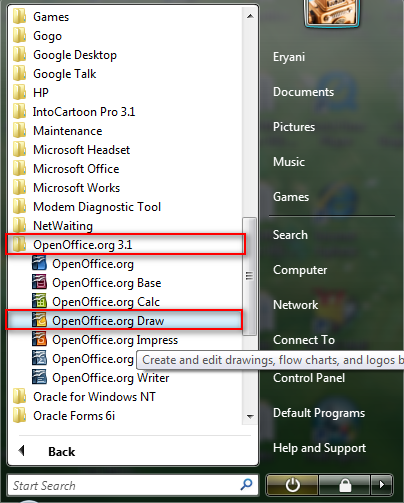
Start the Draw program on your computer

  1. Click start.
  2. Click All Programs.

Draw.png

  1. Click OpenOffice.org 3.1
  2. Click OpenOffice.org Draw

<flvplayer autoplay=false width=500 height=400>Startinggraphics.FLV</flvplayer>


Drawing Lines

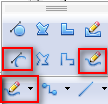
Lines can be made in many ways. Double-click on the line tool. This gives you a line each time you drag. Steps:

  1. Click the line tool in the drawing tool bar.
  2. The pointer becomes a +.
  3. Click once to start.
  4. Click again to end the line.
  5. Double-click to stop drawing lines.


ImpressDrawingToolbar.png

Line.png


<flvplayer autoplay=false width=500 height=400>drawinglines.FLV</flvplayer>


Curved Lines

To make curved lines:

  1. Click DrawingCurve.png Curves.png for curves.
  1. Draw the shape you want with the pencil DrawingCurve.png or Curve.png
  2. Double-click to finish drawing a shape with curve tools.

<flvplayer autoplay=false width=500 height=400>curves.FLV</flvplayer>
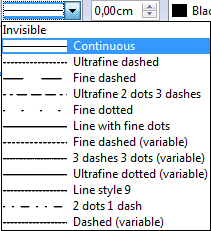
Line style:

  1. Draw a shape.
  2. Select a shape.
  3. Click on the line style arrow.
  4. Click on Dash Style.
  5. Make the lines dotted ………………………
  6. Make the dashes ----------------------

Linestyle.png


<flvplayer autoplay=false width=500 height=400>linestyle.FLV</flvplayer>


Drawing Shapes

To draw a rectangle:

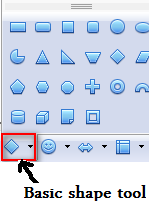
  1. Click on the Basic shapes tool DrawingBasicShapes.png.
  2. Click the rectangle tool in the toolbox Basicshapes1.png
  3. Drag the rectangle pointer down and away from the starting point on the canvas.
  4. Release the mouse button you draw a rectangle.

To draw ellipse shape:

  1. Click the ellipse tool in the drawing tool bar.
  2. Hold down the left mouse.
  3. Drag the ellipse pointer to draw a round shape.
  4. Release the mouse button you draw an ellipse.

<flvplayer autoplay=false width=500 height=400>drawingshapes.FLV</flvplayer>


Using Colors

The paint program gives you choices of color. The color box contains 28 different colors.

  • Click on a line or a shape to select it.
  • Click Line Color and Area Style/Filling tools in the Line and Filling tool.

Coloring.png


<flvplayer autoplay=false width=500 height=400>colorlines.FLV</flvplayer>


<flvplayer autoplay=false width=500 height=400>coloringshapes.FLV</flvplayer>


Grouping

  1. Draw a picture of a face using lines and shapes.
  2. Click the select object arrow.
  3. Drag a rectangle all round the picture Or to select click Edit then Select All.
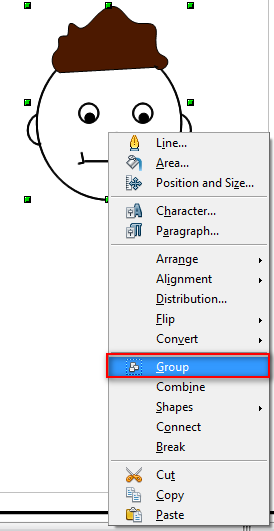
  4. Click the right button of the mouse then click group.
  5. This holds the pieces of your picture together.
Groupeface.png

Sellect the Draw:

<flvplayer autoplay=false width=500 height=400>sellectdraw.FLV</flvplayer>

Group the draw

<flvplayer autoplay=false width=500 height=400>group.FLV</flvplayer>


Drawing Details

Zoom makes part of the picture look bigger. Zoom helps draw details.

  • Draw a small circle.
  • Click on the zoom.Zoomtool.png
  • Click Zoom In.Zoomintool.png
  • Click on the object.
  • The object gets bigger.
  • Draw 2 smaller circles and a line inside.
  • Click on the zoom 100% this makes you zoom back to the real size.
    Zoom100%.png
  • Click zoom in tool again and add hair.
  • Add more details.
  • Zoom out to see the finished drawing.
  • Remember to Group the face.

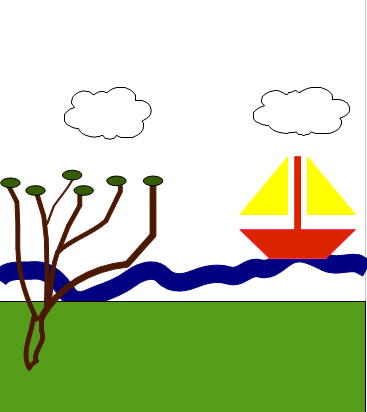
Draw the following picture:


Drawapicture.png