Pulleys Lesson
Pulleys
This lesson is intended to address the BC Grade 5 Physical Science Learning Outcomes but may be adapted to suit a wide range of grade levels from Primary to Intermediate.
Students will be able to
|
Introductory Note
The teacher will guide students to discover that a pulley can make work easier. Discussion about pulleys will follow the discovery lesson.
Materials
- 5 -1 metre lengths of 16mm or 20mm dowling (you can use pointer sticks that are available in some schools)
- 10 spools of craft ribbon in various widths or 10 empty paper towel rolls(industrial quality works best)(If you choose paper towel rolls then a roll of string is also needed to replace the fibbon)
- 10 desks (2 per group)
- 5 metre sticks
- 5 ice cream buckets
- tape
- scissors to cut ribbon
- 5 stopwatches or a classroom clock with second hand
- 2 cases of soup, water or similar canned goods
- class set of record sheets to record hypothesis, materials, procedure, and conclusion
Procedure
Is it easier to lift the goods with the pulley system or without?
- Explain and post the question we are exploring as above. Explain the procedure once materials have been distributed.
- Distribute recrod sheets and have students record their hypothesis
- Divide students into 5 small groups and give each group a set of materials(1 dowling stick, 1 spool, 1 metre stick, scissors, 6 to 8 cans of soup and have them arrrange themselves around 2 desks
- Students use metre stick to measure 1.5 metres of ribbon and cut it from their spool then tape the end on the spool down so it doesn't run off.
- Ask one student in each group to place the cans on the floor by one of the desks.
- One student from each group will then lift the cans one at a time onto a desk. Another student in the group will time how long it takes to lift the cans. Groups monitor how much effort is required to lift the cans.
- Next challenge groups to find an easier way to lift the cans using one of the items from their materials. ( hopefully they discover they have the bucket! If not, guide them) Groups time how long that takes and monitor how much effort it takes this time to lift the cans.
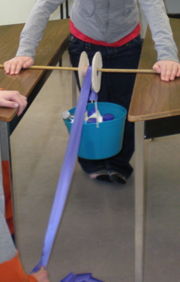
- Challenge students to develop a pulley with the materials and lift the cans from the floor to the desktop using the pulley they design. Students time the lift and monitor how much effort it takes to lift the cans this time.
- Which way was easier? If you were lifting bricks from the bottom floor to the first floor in a building which way would you choose?
- Students record materials,procedure and conclusion.
Discuss various student results and conclusions.
The pulley system should make the work of lifting loads easier. the amount of work stays the same but the work is made easier because pulling down on the ribbon is made easier due to gravity. What are examples of pulleys in the real world? (flag pole, elevators, window washers, lawnmowers,etc.)
Extensions
- Does it make the work easier to use 2 or 3 pulleys in combination with each other (block and tackle)?
- How much ribbon do you need to lift the loaded bucket 30 cm off the floor? 60cm?
Return to: Simple Machines

