Not your average heap of trash
Biology in Middle Schools home | |Elementary School sister project

Biology In Middle Schools is a Saint Michael's College student project. Link under 'toolbox' for a printer-friendly version. Click on handouts to print full resolution versions. Please see Wikieducator's disclaimer, our safety statement, and the Creative Commons licensing in English and in legalese.
Primary biological content area covered
CS #4- Life Science
- Observe natural interactions and life cycles of plants, animals, and decomposers.
- Connection to earth worm unit
- Bridge to life cycles of plants, animals.
- Vitality of nutrients, and nutrient cycling.
- Role of phosphorus, nitrogen, and carbon.
- Vitality of nutrients, and nutrient cycling.
Materials1
- Two 2-liter or 3-liter soda bottles
- Styrofoam® plate or tray
- One smaller plastic container such as margarine tub that fits inside
- the bottom of the soda bottle
- Drill or nail for making holes
- Duct Tape® or clear packaging tape
- Utility knife or sharp scissors
- Insulation material (sheets of foam, rubber, or fiberglass)
- Fine-meshed screen or fabric (nylon stocking) that will be large enough to cover ventilation holes to keep flies out
- Dial thermometer with 20 cm stem
- Chopped vegetable scraps such as lettuce leaves, carrot or potato peelings, and apple cores, or garden wastes or grass clippings
- Bulking agent such as wood shavings or 1-cm pieces of paper egg cartons, cardboard, or wood
- Hollow flexible tubing to provide ventilation out the top
Handouts
This handout contains some basic summary information to serve as a supplement for student study.

Description of activity
The students will each create a small scale composting experiment. This will use a soda bottle as a container to which the students will add the necessary components for composting to occur. At home if a students wishes to begin composting, the same methods can applied and earthworms can be added. This can also be applied to school wide composting if an area is available in the school yard or through a local composting organization such as the Intervale.
Lesson plan
- Carbon and nitrogen are essential elements for life. Carbon is used by all forms of life for energy. Plants use carbon to make energy from the carbon dioxide we breathe out and is producted by exhaust from cars and factories. Nitrogen is essential for many life components but is a part of protein and DNA, the hereditary material. All cells have carbon in their membranes as well, which is essential for life. Without carbon and nitrogen, life could not exist. Cells would not be able to grow and divide. Hereditary material, what you get from your mom and dad (why you look like them) could not be passed down.
This activity goes over how the earth restores its nutirents so that plants and animals can grow and live. Composting involves food, plants, animals, and animal wastes decomposing to return the nitrogen and carbon they contain back into the earth's soils. Small creatues (called microorganisms), molds, and fungi are responsible for breaking down the compost. These organisms and cells use the carbon and nitrogen from the items in the compost as food so they can make glucose and other organic molecules required to survive. Compost is best accomplished at moderate temperatures and has air introduced into it so organisms that require oxygen do not die. The earthworms eat the compost as well; their excrement also adds nutrients to the soil. Important: the earth worms should not be included in the bio reactors because there is not suffient moisture and more importantly no soil for them to live in. Follow the directions below to make your own bio reactors!
Directions for Bio Reactor1
1. Cut the top off one soda bottle just below the shoulder and the other just above the shoulder with a sharp knife. Using the larger pieces of the two bottles, you will now have a top from one that fits snugly over the bottom of the other.
2. Trace a circle the diameter of the soda bottle on a Styrofoam plate and cut it out, forming a piece that fits snugly inside the soda bottle. Use a nail to punch holes through the Styrofoam® for aeration. The circle will form a tray to hold up the compost in the bioreactor. Beneath this tray, there will be air space for ventilation and leachate collection.
3. If your soda bottle is indented at the bottom, the indentations may provide sufficient support for the Styrofoam circle. Otherwise, you will need to fashion a support. One technique is to place a smaller plastic container upside down into the bottom of the soda bottle. Other possibilities include wiring or taping the tray in place.
4. Fit the Styrofoam® circle into the soda bottle, roughly 4–5 cm from the bottom. Below this tray, make air holes in the sides of the soda bottle. If you are using a plastic container to hold up the Styrofoam® tray, you may need to drill holes through the container as well. The purpose is to make sure that air will be able to enter the bioreactor, diffuse through the compost, and exit through the holes or tubing at the top. Avoid making holes in the very bottom of the bottle unless you plan to use a pan underneath it to collect whatever leachate may be generated during composting.
5. Next, determine what you will compost. A variety of ingredients will work, but in general you will want a mixture that is 50–60% water by weight and has approximately 30 times as much available carbon as nitrogen (a C:N ratio of 30:1). You can estimate moisture by using the rule of thumb that the mixture should feel as damp as a wrung-out sponge. Similarly, mixtures that will achieve optimal C:N ratios can be either estimated or calculated.
- High carbon: wood chips or shavings, shredded newspaper, and brown leaves.
- High-nitrogen: food scraps, green grass or yard trimmings, and coffee grounds.
Try to include more than just a couple of ingredients! Mixtures containing a variety of materials are more likely than homogeneous ones to achieve hot temperatures in soda bottle bioreactors.
6. Loosely fill your bioreactor. Remember that you want air to be able to diffuse through the pores in the compost, so keep your mix light and fluffy and do not pack it down.
7. Put the top piece of the soda bottle on and seal it in place with tape.
8. Place the soil thermometer in the opening of the soda bottle, then cover the top hole with a piece of screen or nylon stocking held in place with a rubber band. Alternatively, if you are worried about potential odors, you can ventilate your bioreactor by running rubber tubing out the top. In this case, drill a hole through the screw-on soda bottle lid, insert tubing through the hole, and lead the tubing either out the window or into a ventilation hood. (We used tape) Recommended for classroom observation!!!
9. If you think flies may become a problem, cover all air holes with a piece of nylon stocking or other fine-meshed fabric.
10. Insulate the bioreactor, making sure not to block the ventilation holes. (Because soda bottle bioreactors are much smaller than the typical compost pile, they will work best if insulated to retain the heat that is generated during decomposition.) You can experiment with various types and amounts of insulation
11. Record temperature every day for 3 weeks. The temperature will be used for the math connection calculation.
12. The bioreactors may be sent home. The students may wish to start an outdoor compost with the earthworms and this would be a great start!
For a step by step photogallery, see below. All photos taken by website creators (BCC & WEH).
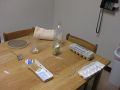
Figure 1. All necessary materials.
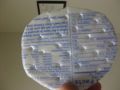
Figure 2. Holes in Styrofoam®.
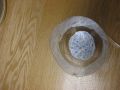
Figure 3. Styrofoam® in place.
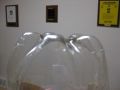
Figure 4. Holes in bottom of bottle.
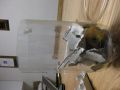
Figure 5. Beginning to look finished.
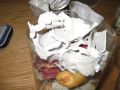
Figure 6. Full bioreactor!
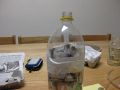
Figure 7. Taped together!
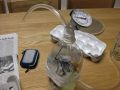
Figure 8. Totally complete.


Potential pitfalls
The students should not cut the soda bottles themselves. A sharp knife is required and the plastic can cut students if not cut cleanly. Two people are required to put together the top and bottom halves of the reactor. Also, the food scraps that go in may smell, try to use a variety of compostable materials such as leaves and grass clippings to add carbon and nitrogen to the system.
Math connections
- This activity allows for students to apply knowledge of graphing of a independent variable (temperature) over a dependent variable (time).
Literature connections
The book Earth by Alfred Leutcher discusses composition of soils and different soils. It doesn't specifically speak to actively composting but mentions how the leaves in the fall, the decaying animals, and how worms help recycle and imporove soil quality.
Connections to educational standards
- S5-6:34
- Students demonstrate their understanding of Energy Flow in an Ecosystem by...
- Developing a model that shows how the flow of energy from the sun is trasferred to organisms as food in order to sustain life.
- Science Concept:
- Energy within an ecosystem originates from the sun. Plants use energy from the sun, carbon dioxide, and water, to make energy-rich food and oxygen.
- Plants are producers.
- Animals eat food that plants make combined with oxygen to produce energy, carbon dioxide, and water.
- Animals are consumers.
- Students demonstrate their understanding of Energy Flow in an Ecosystem by...
- S5-6:35
- Students demonstrate their understanding of Food Webs in an Ecosystem by...
- Developing a model for a food web of a local aquatic and local terrestrial environment.
- Science Concept:
- Food webs model the interdependent relationships that organisms engage in as they acquire their food and energy needs. Aquatic food webs (fresh water and marine) are supported by microscopic ocean plants. Land food webs are supported by land plants.
- Students demonstrate their understanding of Food Webs in an Ecosystem by...
- S5-6:36
- Students demonstrate their understanding of Equilibrium in an Ecosystem by...
- Experimenting with a closed system, describing how an environmental change effects the system (e.g., bottle biology).
- Science Concept:
- The number of organisms an ecosystem can support depends on the kinds of organisms present and the availability of biotic and abiotic resources (i.e., quantity of light and water, range of temperatures, and soil composition).
- Students demonstrate their understanding of Equilibrium in an Ecosystem by...
Next steps
Once you have completed the activity, what other information can be learned from the materials and resources at hand? What additional activities could be developed using the equipment and materials you have listed above? What other opportunities to learn can be explored based on student questions and input?
Reflections
Edit this section after you have tried the activity with grade school students. What worked well? What was unexpected? What previous knowledge did the students bring to the activity and how did that compliment your lesson? Are there any must do components that did or would particularly enhance the learning experience? Other helpful thoughts.
Citations and links
1. Materials/Methods Section: Trautmann, N. M., Krasny, M.E. Composting in the Classroom. 1997. Cornell University Press. Available through http://www.cornell.edu
Vermont Science Standards
Sources and useful summaries
| Work in progress, expect frequent changes. Help and feedback is welcome. See discussion page. |