Magnetic Breakfast
| Instant wiki maker | Making handouts | Editing tips |
Contents
- 1 Student worthiness
- 2 Primary biological content area covered
- 3 Other science content area covered
- 4 Materials
- 5 Handouts
- 6 Description of activity
- 7 Lesson plan
- 8 Potential pitfalls
- 9 Math connections
- 10 Literature connections
- 11 Connections to educational standards
- 12 Next steps
- 13 Reflections
- 14 Citations and links

Biology In Elementary Schools is a Saint Michael's College student project from a course that ran between 2007 and 2010 and fully described in this book chapter. The student-created resources have been preserved here for posterity. Link under 'toolbox' for printer-friendly versions of the exercises. Click on handouts to print full resolution versions. Please see Wikieducator's disclaimer, our safety statement, and the Creative Commons licensing in English and in legalese.
Student worthiness
This experiment has been tested by the teachers on their own. It has also been tested with students and worked very well. Versions of this experiment have been recommended online.
Primary biological content area covered
This experiment addresses briefly iron and how it is absorbed into the body and why it is needed in the human body to maintain its health. Iron is a nutrient that's needed to make hemoglobin, the oxygen-carrying component of red blood cells (RBCs).Red blood cells circulate throughout our bodies to bring oxygen to all of the cells. Without a sufficient amount of iron, the body cannot make enough RBCs, and tissues and organs will not get the oxygen they need. It is important for kids and teens to get enough iron in their daily diets. Kids ages 1-12 years old need 7-10 milligrams of iron each day.
Other science content area covered
This experiment mainly addresses magnetism. This includes what kind of metals and things magnets attract and how they work. It also shows some unique ways in which magnets can be used including Cow Magnets. Magnets are normally made of metal iron, or another material that has lots of iron in it, such as steel. Magnets come in many different shapes and sizes, but all of them have the ability to pull objects towards themselves. This invisible force is called magnetism. Magnets only attract (pull) metals that are made of iron or that contain iron. The poles of two magnets that are different or opposite will attract. Magnetic lines of force from north and south poles pull together and join. The poles of two magnets that are the same will repel or push each other apart.
Materials
Materials for Teachers
- Warm water
- 1 Measuring Cup
- Plate
- Masking tape
Materials for Each Student Group
- Strong Magnet (Cow magnets are suggested)
| Cow magnet | |
| Wikipedia has an article on this subject.
Visit Cow magnet for more in depth information |
- 1 box of Total® Cereal (or other Iron Fortified Cereal)
- Other items that are attracted to magnets - for example: paper clips, pipe cleaners, screws, nuts and bolts, scissors
- Various items that are not attracted to magnets - for example: feathers, tin foil, cloth
Materials for Each Student
- Magnets (various sizes and shapes)
- Quart sized Ziploc® bag
- Worksheet
- Materials
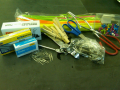
Figure 1: Magnetic Materials. Click to enlarge.
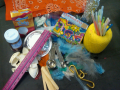
Figure 2: Non Magnetic Materials. Click to enlarge.

Figure 3: Cereal Experiment Materials. Click to enlarge.
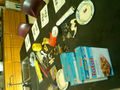
Figure 4: Materials on the table. Click to enlarge


Handouts
The handouts are four pages long and each page is a different document.
- Handouts
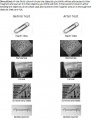
Figure 5. First page of Handout. Click to Enlarge.
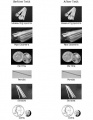
Figure 6. Second page of Handout. Click to Enlarge.
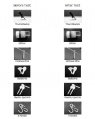
Figure 7. Third page of Handout. Click to Enlarge.
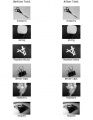
Figure 8. Fourth page of Handout. Click to Enlarge.


Description of activity
In this activity, students will be extracting the iron from Total cereal using magnets. They will be putting the cereal in a plastic bag and mashing it up with water. They will then use the magnets to attract the metallic iron from the cereal mixture. People believe that iron is digested in the stomach and eventually absorbed in the small intestine but many nutritionists believe that the iron simply passes through your system. Iron is needed in your daily diet and this is important to inform the students. This activity also works with magnetism. Students will be able to learn through this lesson that magnets only attract (pull) metals that are made of iron or that contain iron. That is why this experiment will be interesting, they can attract items like nuts and bolts and also their cereal!
Lesson plan
20 Minute Lesson Plan geared for 1st grade students.
First 5 minutes
- Ask the students if they know anything about magnets. When they say yes ask them if they know how they work, and what kinds of metals magnets are attracted to.
- Explain that magnets are attracted to iron and that opposites attract and create a magnetic force.
- Have the students fill out the left column of the handout. They will be circling which pictures of items they believe are magnetic. Let them know that they are hypothesizing, making a testable educated guess about which items are magnetic.
- Once they are finished, ask the students if any of them circled the cereal as being magnetic. They will most likely say no. This is when you tell them we will be performing a experiment which will show them otherwise.
Next 5 Minutes
- Measure 1 cup of Total cereal on to a plate.
- Give 1 plate to 2-3 students.
- Have them crush the cereal into small pieces.
- Once the cereal is crushed, pour it into a quart size zipper-lock bag.
- Fill the bag at least half full with warm water.
- Seal the bag, leaving an air pocket.
- Have the students mash the cereal by squeezing the bag and crushing it with their hands until they have a brown, soupy mixture (Picture Below). Note: The more finely ground the cereal is, the easier it will be to get the iron.
- Make sure the cereal is completely dissolved before continuing the experiment.
Next 5 Minutes
- Checking to make sure the bag is completely closed, lay the bag on the palm of your hand.
- Place the cow magnet on top of the bag.
- Put your other hand on top of the magnet and flip the whole thing over so the magnet is underneath the bag. (Picture Below)
- Move the contents of the bag slowly for 15-20 seconds. Have the students help you slowly shake the bag while it is still on your hands. By doing this you are attracting the free moving pieces of metallic iron in the cereal to your magnet.
- Now flip the bag so the magnet is on top again.
- There should be tiny black specks on the inside of the bag around the sides of the magnet. This is the iron.
- Move your hand in small circles around the bag, more iron will attract.
Last 5 minutes
- Explain to the students that this is the iron from their cereal.
- You can extract the iron from the bag by opening it and putting a magnet in the bag to pull it out, it helps to cover a magnet with masking tape so that it can be easily seen.
- Next, Give the students magnetic and nonmagnetic items to experiment with.
- Have them play with the magnets and test their hypotheses.
- Have them circle in the right column which items are actually magnetic.
- For the last few minutes have the students organize the materials on the table to help cleanup.
- Experiment in Action

Figure 9: Crushing the cereal by shaking it. Click to enlarge.
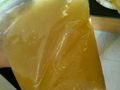
Figure 10: The cereal and water mixture. Click to enlarge.
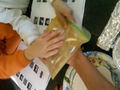
Figure 11: Holding the magnet underneath the cereal. Click to enlarge.


Potential pitfalls
There were a few difficulties in this experiment that can be easily avoided. It is important to use warm water which allows the cereal to dissolve quicker in the bag. It is also important not to pound the bag against any surfaces because it may create holes. Make sure the bag is sealed when doing this experiment or you will have a soupy mess. The students will enjoy crushing the cereal in their bag but they may need some assistance from the teacher. Make sure the students understand what iron is and that magnets attract iron before this experiment begins. It is also important to leave air in the bag that way you have the magnet on top of the blown up bag, if you do not leave air then you will not be able to see the effects of the magnetism. Also make sure that no students have a nut allergy because Total cereal has nuts in it. With all of the cereal crushing, this experiment leaves your work area pretty messy, so keep a broom handy!
Math connections
The students in a first grade classroom can begin by counting the objects that are magnetic and those that are not. They could then make a chart of which items are magnetic and which are not and then turn this information into a graph. Another extension math activity could be using two different types of cereal. They would then extract the iron from each cereal and weigh it to compare which cereal has more iron.
Literature connections
You could connect this lesson to literature through the book:
- Amazing Magnetism (Magic School Bus Chapter Book) by: Rebecca Carmi.
A teacher could read this book prior to the lesson that way students have a basic understanding of magnets. You could also have the students write a fun poem or story about magnets after this lesson. They could talk about how magnets attract iron and how you can find it not only in metals but also in unlikely materials like your cereal!
Connections to educational standards
- 7.1.f. Use either deductive or inductive reasoning to explain observations and phenomena, or to predict answers to questions
- S1-2:25 Students demonstrate their understanding of Magnetism by…
∙ Investigating, observing and describing how magnets can make some things move without touching (e.g., determining the distance needed for a magnet to attract an object).
Next steps
The materials used in this activity can easily be used for other activities. Since we used magnets to extract the iron in cereal you could also do simple lessons with the way magnets work. Teaching the students about the magnetic force and making a hands on activity that will give students the ability to learn on their own.
We specifically used cow magnets in this experiment and I think that it would be extremely interesting to do an activity that showed the process of using a cow magnet on a farm. Connecting it to the human body and digestion it would be great for students to learn how magnets are used in the working world. Having them compare the positive effects of magnets in certain work places it would be very educational to see how magnets are used for reasons many people don't even recognize.
Another extension involves testing multiple cereals. You could test cereals with high and low iron content and see if there is any difference. You could also test other foods known to have iron like dairy creamer. This experiment has extensions that are very easy and can be attained without much effort!
Reflections
After doing this activity with the first graders it became clear how interesting this is. Having the students make predictions about which objects are magnetic and which ones aren't gave a connection to the scientific method and making hypotheses and observations. During the actual experiment it was very interesting to hear the students talk about whether or not the cereal would be magnetic. The unfortunate part of the later groups was that many students had already heard that the cereal was magnetic so the element of surprise was ruined. Aside from this minor set back towards the end it was great to see the reactions of the students. They all really engaged with the activity and thought it was so cool so actually see the iron that goes into your body.
We were really lucky that many of the students had prior knowledge about magnets and how they work. Each student seemed to really understand the importance of iron in your diet and it connected directly to their everyday lives as many people eat iron everyday.
The one thing that was a surprise for our group was one of the students had a severe nut allergy and was unable to fully participate in the experiment. The cereal we used had almond ingredients which made the one student unable to touch the cereal. We found a few magnets that had not touched the cereal and allowed the student play with different objects. They also were able to watch the experiment in action so they weren't completely disconnected from the whole activity. The suggestion for this is to make sure you have accommodations for all students. If we had previously known that a student had a allergy to this cereal we would have tried to find a cereal that didn't have any nut products. Although, this was a really good test for us as it kept us on our toes and allowed us to be flexible in the activity as teachers are everyday.
The students really enjoyed this activity and the hands on element was crucial for the overall learning experience.
Citations and links
Main Idea came from: http://www.stevespanglerscience.com/experiment/00000034