Magic Moisture
| Instant wiki maker | Making handouts | Editing tips |
Contents
- 1 Magic Moisture
- 1.1 Student Worthiness
- 1.2 Primary Biological Content Area Covered
- 1.3 Materials
- 1.4 Handouts
- 1.5 Description of Activity
- 1.6 Lesson Plan
- 1.7 Potential Pitfalls
- 1.8 Math Connections
- 1.9 Literature Connections
- 1.10 Connections to Educational Standards
- 1.11 Reflections
- 1.12 Word Wall
- 1.13 Citations and links
Biology In Elementary Schools is a Saint Michael's College student project from a course that ran between 2007 and 2010 and fully described in this book chapter. The student-created resources have been preserved here for posterity. Link under 'toolbox' for printer-friendly versions of the exercises. Click on handouts to print full resolution versions. Please see Wikieducator's disclaimer, our safety statement, and the Creative Commons licensing in English and in legalese.
Magic Moisture
Student Worthiness
Tried and trusted
Primary Biological Content Area Covered
- Condensation stage of the water cycle
- The scientific method
Materials
- Crushed ice
- Salt
- 4 empty glass jars
- Oven mitts
- 2 thermometers
- Tea kettle (optional)
Handouts
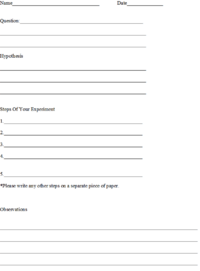
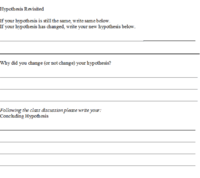
The following are possible handouts (Figure 1a and 1b) to have students fill out the steps of the scientific method as they follow them in the experiment.Description of Activity
Students will discuss what happens to a jar of water after it is taken out of the refrigerator. Once it has been concluded that the jar seems to "sweat" or has droplets of water on the outside, the students will be asked why they think this happens. Students will then hypothesize, perform an experiment, and accept or reject their hypothesis.
Lesson Plan
- The lesson will start with a discussion on whether anyone has ever noticed what happens to a glass after it is taken out of the refrigerator.
- Students will be proposed the question: "When a glass filled with liquid is 'sweating', where do the drops of water on the outside of the glass come from?".
- They will then discuss where they think the water comes from and then come up with a theory or hypothesis. (For example: We think the drops of water on the outside of the glass come from (fill in the blank)).
- Students will then be instructed to write down their hypothesis in the section "Hypothesis" on their Lab Sheet (Sample Lab Sheet- see Figure 1a and 1b).
- Next students will be instructed to fill a glass with ice cubes and water with food coloring (for fun and to more easily show the fill line).
- For our particular experiment students set up their own glass, and we prepared one so the students could see the results right away.
- After setting up the jar, students will think of the things they did step by step during the experiment and write them on their Lab Sheet in "Steps of Your Experiment".
- Students will then either wait 15-20 minutes for water to condense on their own cup or the teacher will show them a cup that was filled prior to the beginning of the activity.
- If crunched for time, add salt in a jar to lower the melting point and expedite the condensation process.
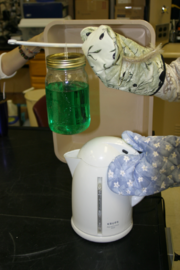
- Another way to speed things up is to place a bowl of boiling water directly under the bottom of the jar--the steam will help the jar to accumulate condensation more quickly. We boiled an electric kettle under our jar. Figure 2 shows the procedure we used with the tea kettle.
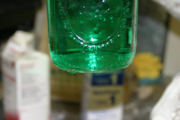
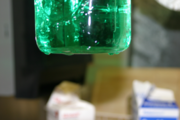
- Students will observe what happened and record their observations in the section "Observations" on their Lab Sheet. Figures 3 and 4 show the results that many of the students will observe (these particular results were obtained using a tea kettle).
- Then students will discuss whether or not their first hypothesis "fit" their observations or if they need to reject their hypothesis
- If the hypothesis was rejected students will be instructed to write their alternative hypothesis under "Hypothesis Revisited" on the Lab Sheet.
- Students can then answer the question "Why did you accept (or reject) your hypothesis?" on their lab sheet.
Optional:
- Students can get together as a class and discuss their findings.
- They can present their hypothesis as well as the different conclusions everyone came up with.
- Students may decide to re-think their findings.
- The class may choose to redo the experiment.
- When students feel comfortable they can then write on their Lab Sheet the Hypothesis they supported, or a new one to test.
Potential Pitfalls
- After doing a test run of this experiment, we found that it takes far longer to "create" condensation than we had previously thought.
- In order to combat this problem, we used a tea kettle to increase the condensation level. This may complicate the math connection, however it would still be possible as long as it was noted that a kettle was used.
- We also discovered that using the salt to make the ice extra cold only prolonged the process because the condensation froze and did not drip; if you have limited time do not add salt. However, if you do have the time, the students were intrigued by the fact that it caused the glass to become frosty.
Math Connections
Regardless of whether or not salt is added to the jar, you can add a math connection to this project.
- During the experiment you can have the students measure the temperature of the different glasses of ice (one with salt and one with out) and record the difference. If the students are not used to using thermometers you might have to assist them in reading the temperature.
- From the moment that the jar is filled with water (and/or salt), have one student start a timer.
- Have a second hold the jar by the rim.
- Have a third student be in charge of counting the number of drips from the jar (into a container) every minute.
- Note the time when all the ice cubes have melted, however continue to measure the drops.
- In the end students will be left with a chart which shows how many drops of water fell each minute.
- Have the students (either as a group or individually) convert their table into a bar graph with time on the "X" axis and cumulative number of drops on the "Y" axis.
Literature Connections
If time permits read a story about condensation (and the water cycle). The book listed below is a suggestion:
White, Carolyn, 2003, Snowff's Mist-erious Journey, AARO Publishing, Inc.
Connections to Educational Standards
- 7.1 Students use scientific methods to describe, investigate, explain phenomena, and raise questions.
- 7.12 Students understand forces and motion, the properties and composition of matter, and energy sources and transformations.
Reflections
- Our first group of students took the longest time to get through the experiment and with each group after it went faster. Timing is important to keep in mind with all activities you do with your students. As a teacher, you should always have "extra" work to keep your students focused if your activity ends before the allotted time.
- We had a few groups that were very hard to get them focused, they were more concerned with what the next activity was. This stresses the importance of making each activity you do hands-on and exciting.
- We did have some technical difficulties with the experiment at first regarding the ice, eventually we were able to straighten it out; however, it did cause some questions from parents/teachers that we were unsure of how to answer. Teachers should make sure they are knowledgeable in all aspects of the activity in order to provide students with answers to any questions.
- I was able to see the importance of providing students with a "word wall", particularly one with all the words spelled out. When in a new setting the students often times are to shy to ask a new teacher for help.
- Although the worksheet was a good resource to use, I felt many of the students found the worksheet to be tedious and did no find interest in it. The worksheet is a good way to teach and reinforce the scientific method to students, it may be beneficial to condense the worksheet into writing down the hypothesis and observations and possibly handing out the procedure of the experiment to the students.
- It would have been more beneficial for this experiment to have a more testable hypothesis. Some of the students were confused as to whether to accept or reject their hypothesis. It was not quite clear to them where the condensation actually came from. A lot of the students found that the water coming off of the jar was not the same color as the water on the inside of the jar. It is possible for this experiment to have the students hypothesize whether or not the water condensing on the outside of the jar will be the same color as the water on the inside of the jar. This would be a more testable hypothesis.
- This project worked a bit better in theory than in actuality. As a group we underestimated both how long it was going to take for condensation to form on the outside of the jar as well as the concentration span of a 3rd or 4th grader. There was a group behind us doing a very exciting hands on experiment about the brain and the noise and excitement from that group definitely had a negative impact on our group. One problem that we encountered from the beginning was that many students had a hard time understanding where the condensation came from. Many thought that it came from inside the jar, however couldn't then understand why the cup didn't "sweat" colored liquid. We tried to amend this idea by saying that it came from the combination of two different temperatures meeting and this created condensation. Unfortunately, most of the students didn't really seem to be understand this concept. Also, many seemed bored with the scientific method which to some extent they don't have a choice with. One kid asked me "do I really have to do this?" to which i replied, "yes, because for the next twenty minutes I'm the teacher and I said so". They liked when the jar did finally produce condensation but it really lacked a hands on aspect to it.
Word Wall
- Condensation
- Agent
- Vapor
- Moisture
- Melting Point
Citations and links
We borrowed the idea and the handouts (figure 1a and 1b) from this website: http://www-k12.atmos.washington.edu/k12/modules/nw_wx_watch/index.html
| Work in progress, expect frequent changes. Help and feedback is welcome. See discussion page. |

