Good Vibrations
| Instant wiki maker | Making handouts | Editing tips |
Contents

Biology In Elementary Schools is a Saint Michael's College student project from a course that ran between 2007 and 2010 and fully described in this book chapter. The student-created resources have been preserved here for posterity. Link under 'toolbox' for printer-friendly versions of the exercises. Click on handouts to print full resolution versions. Please see Wikieducator's disclaimer, our safety statement, and the Creative Commons licensing in English and in legalese.
Student worthiness
This idea is tried and trusted. The basic idea for the instruments and lesson came from this site: [2]
Primary biological content area covered
Students will be introduced to the concepts of sound, pitch, and volume and frequency. They will learn that the key element to sound is vibration. The ear, what enables humans to hear sounds, and vocal cord vibration will also be talked about.
Materials
- Scissors
- Construction Paper
Ear Guitar
- Plastic Cups
- String
Drum Group
- Balloons
- Plastic Jug (Opening 5 inches in diameter)
- Rubber Bands
Maraca Group
- Plastic Cups
- Beans
- Tape
Guitar Group
- Tissue Boxes
- Rubber Bands
Handouts
See Figure 4 in Picture Gallery
Description of activity
During this activity children will learn about pitch, volume, and sound waves. Beginning with the ear guitar demonstration, students will hear how sound waves travel through the air. This simple and cheap demonstration allows students to experience first hand the transfer of sound waves from one point to another. Next the students will make their own instruments to better understand volume and pitch. Different instruments are capable of producing different pitch and volume can fluctuate depending on how they are played. Students will gain an understanding of how musicians control pitch and volume in order to produce the right sound. The vibrations given off by the instruments can be connected to the way in which human vocal cords give off vibrations causing sound waves to travel through the air.
Lesson plan
Things to Prepare
- 4 ear guitars (idea taken from site: [1]
Take two plastic cups and put a hole in the bottom of each. Cut two arm span lengths of string or about ten feet. Put the string through the hole and knot the string on the inside of the cup. Do this on both ends of the string. Repeat these steps creating one ear guitar for every group of two students.
- Print fill in the blank handout (See Figure 4)
Lesson Plan
- Start with pairing off the students and giving each pair an already prepared ear guitar.
- Explain how to use the ear guitar and have them pluck the string once while having the string taut and then once when the string is a little loose. Then we will tell them that they can use the ear guitars as a telephone and say, “Hello” to their partner.
- Then all the students will sit down and we can ask them what they noticed/heard. We will explain the concepts of sound, vibrations, volume, frequency, and pitch. As well as make a science connection to vibrations in your ear and vocal cords. (To illustrate this, we will have students place their hand on their neck while talking to feel the vibrations which are causing the sounds to come out of their mouths and use Figure 6)
- While explaining concepts, we will walk through the fill-in-the-blank handout with the students and have them act out the differing sounds. (example: Have them tap the desk with their pencil and make a loud noise and then a soft noise, and then explain that they changed the volume)
- Now the students will have time to make their own musical instruments.
- Once the instruments are all made, we will ask the students questions such as:
- Who has an instrument that makes a high pitched noise?
- Who has an instrument that makes a low pitched noise?
- Who can use their instrument to demonstrate a change in volume?
- Who can make a sound with a high frequency?
- Who can make a sound with a low frequency?
Potential pitfalls
Some potential pitfalls we found after running this lesson mostly had to do with time constraints. The amount of time we had did not always allow us to spend as much time talking about the instruments, and we found that it was easiest to have each child make maracas. Instead of making guitars and drums, we gave the students some that we had already put together to play around with. This can easily be avoided by allowing more time to conduct the lesson. Another potential pitfall for us was the peanut allergy. To avoid any allergic reactions make sure that the containers being used for the drums contained peanut free products. Other than these minor things the lesson seemed to run smoothly.
Literature Connection
This lesson can be further explored using the book How do Animals Use Their Voices and Sound by Lynn Stone, to compare and the ways in which humans and animals use their voices and sound to communicate.
Stone, Lynn M. How Do Animals Use Their Voices and Sound?. Grand Rapids: Rourke, 2007.
Art connections
Each student will make their own musical instrument out of recycled and some new materials. Children get to express their creativity in the making of these instruments while coming to understand the benefits of using recycled materials from around the house to create science projects and artistic pieces.
Connections to educational standards
Vermont State Standards
- 3-4:41
Students demonstrate their understanding of Human Body Systems by showing connections between external and internal body structures and how they help humans survive. Mater Christi’s Core Standards for Science
- CS#1 Human structures and Functions
- Identify structures of the human body
- Students use scientific inquiry skills to show and explain that the human body is a unique combination of systems that can be affected by the environment.
- CS#2 Physical Science
- Students use scientific inquiry skills to show and explain that all living and non-living things are composed of matter having characteristic properties that distinguish one substance from another.
Next steps
Further information can be gleaned from this lesson through exploration into music, pitch, and tuning See [Water Organ]. To further demonstrate pitch, take a straw cutting one end to make a triangular reed. Then blow into the reed while cutting the opposite end. As the straw gets smaller the pitch gets higher, demonstrating change in pitch. Differences between volume, pitch, and frequency can be further explored by conducting a classroom orchestra. Ask students to demonstrate "low volume" or to create a "high frequency" sound.
Reflections
- I had a lot of fun with this lesson, and the students did as well. They were very excited to use the ear guitars and make their own instruments. Some prior knowledge was the idea of an ear drum, and a few knew about volume. I definitely recommend having them feel their throat while talking because they connected to the concept of sound as vibrations when they could hear their own vocal cords vibrating. (Most of the parents had fun demonstrating this as well) Overall, this was very successful lesson.
- This lesson provided students with an interactive way for students to engage in pitch, frequency, and sound. By connecting all the information back to the ear we were able to help the students understand how the ear work and how it allows humans to hear. The ear guitar demonstration was a blast! The children had so much fun talking to each other with it and hear the vibrations. Guiding the students through our handout reinforced all that we had talked about and allowed for conversation. The students seemed to understand what we were communicating to them after filling out the worksheet. We did not expect that we wouldn't have time to make all the instruments but by passing around our pre-made guitars and drums the children were able to understand the concepts with the other instruments. The students brought previous knowledge about the ear drum and they seemed to catch on quickly with the concept of vibrations and sound waves. Volume was another concept that they seemed to understand fairly well. My favorite part I think enhanced learning the most in the lesson was the ear guitar, it is a simple, cheap, and fun demonstration that most kids enjoyed but best of all, they understood. Overall this was a creative and fun lesson to do. Preparation was fairly simple and students are able to further explore the concepts of volume, frequency, pitch, and the ear.
Picture Gallery
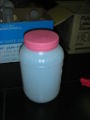
Figure 1: Sample Drum
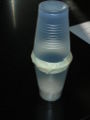
Figure 2: Sample Maraca
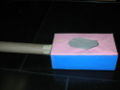
Figure 3: Sample Guitar
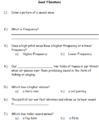
Figure 4: Sound Handout
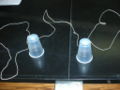
Figure 5:Sample Ear Guitar
Figure 6: Simple ear diagram


Citations and links
1. [http://www.exploratorium.edu/science_explorer/ear_guitar.html]