Disappearing Snow
| Instant wiki maker | Making handouts | Editing tips |
Biology In Elementary Schools is a Saint Michael's College student project from a course that ran between 2007 and 2010 and fully described in this book chapter. The student-created resources have been preserved here for posterity. Link under 'toolbox' for printer-friendly versions of the exercises. Click on handouts to print full resolution versions. Please see Wikieducator's disclaimer, our safety statement, and the Creative Commons licensing in English and in legalese.
Student worthiness
Tried once and worked well!
Primary biological content area covered
States of Matter, Hypothesis testing, designing and running experiments, data collecting, interpreting data
This activity is designed to teach students about the states of matter, particularly solids and liquids. Students will have the opportunity to test and observe how different materials melt snow.
Materials
Teacher's Materials:
- snow
- 35 plastic table spoons
- measuring spoons
- 140 mL beaker 1
- sharpie marker
- masking tape
- a large container (to hold the snow)
- 35 small clear plastic cups to hold snow
- 6 2-inch nails
- 6 timers/stopwatches
- salt
- sugar
- sand
- baking soda
- calcium chloride
1 Glass jars can be used as an alternative to beakers. They are easier to find, and are less expensive than beakers. The beakers were chosen as a tool to measure the snow, to ensure that the same amount of snow would be in each plastic cup that the students were using. If glass jars are used, a line could be drawn on the side of the jar with a permanent marker to ensure that the same amount of snow is being tested by the students in each plastic cup.
Group Materials:
- snow
- salt
- sugar
- sand
- baking soda
- calcium chloride 2
- 6 small clear plastic cups to hold snow 3
- one table spoon
- washable markers
- masking tape
- 6 2-inch nails
- 6 timers/stopwatches
2 Almost any granual material can be tested on the snow. The key is to make sure that there will be varying results that the students will be able to see when doing the experiment.
3 An alternative to this could also be clear glass jars. Baby food jars would be a convenient size.
Handouts
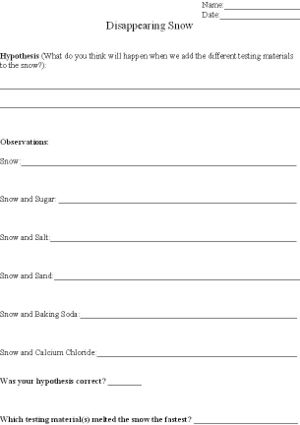
Disappearing Snow Handout
Description of activity
Students will experiment with five different testing materials to see which material(s) melt the snow the fastest. Students will use salt, sugar, sand, baking soda, and calcium chloride to melt the snow. The students will use the scientific method and develop a hypothesis, record observations, and conclusions.
Snow is pre-measured as well as the testing materials. Students are responsible for mixing the testing materials in with the snow making sure all of the snow is at the same level. Students will place one nail in the center of each cup of snow. A time will be set as soon as the nails are placed into the snow. This will enable the students to test which testing material melts the snow the fastest. Snow is considered melted when the top of the nail hits the side of the cup. The students will stop their stopwatch when the nail hits the side of the cup. Throughout this process students will be recording their observations on the handout.
Lesson plan
Pre- Lab set up:
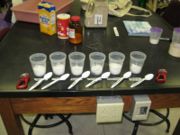
- Put 100mL of snow into six clear small plastic cups. (5 will have testing materials added and one will be a constant with nothing added to it.)
- Put mark on cup to show how much of the cup was originally filled with snow. (This will make it easier to see how much the snow melts.)
- Teacher will measure out 1/2 tsp. of each testing material and put it in plastic bags.
In Class Activity:
- Give each student one of the plastic cups with the 100mL of snow.
- Assign each student one testing material and give students a marker and masking tape. Have students write their testing material on the tape and place the labels in a line on the table.
- Students will now make a prediction on which material will melt the snow fastest and record it on the handout.
- Have students mix in their material into their snow, making sure that it is level with the line drawn on the cup.
- Students will now put one nail with the point facing down in the middle of each cup and begin their timers immediately.
- All the students will then observe all cups, but record when thier nail hits the side of the cup. During this period have a discussion about solids and liquids and the scientific method.
- Then they will be able to see if their hypothesis was correct or incorrect and record it on the handout.
- They also will compare the snow that had nothing added to it to the snow that had the testing materials mixed in.
note Teacher could have students choose from a variety of materials to test on the snow, or have students bring safe materials in from home, cutting the cost of the experiment.
Clean Up:
- Students will dump their cup into the sink and then rinse it out so it is ready for the next group of students to use. Then they will clean the sink and lab table.
Potential pitfalls
One thing that could go wrong is that the snow might melt before the experiment begins. Make sure to keep the snow stored in a cooler, or in a cool room until the experiment begins. If the snow melts, just get some more!
A fresh snowfall would work the best, but if that’s not possible, any snow would work! If snow is not available crushed ice could be used as a substitute. Unfortunately, unlike snow, crushed ice isn't free, but it would work!
Make sure your students do not come in contact with the calcium chloride. Teachers should pre-measure this for the students.
Math connections
Students will learn how to operate a stopwatch and record the time it takes for each material to melt the snow.
Students can graph the results in a bar graph. They can then analyze which material melted the snow the fastest. This will help them visualize the results.
Literature connections
Martin, J.B. 1998. Snowflake Bently. Houghton Mifflin Books for Children
Bently, W.A. 1962 Snow Crystals Dover Publications
Connections to educational standards
S1-2:12 States of Matter
SPK-K:1 Scientific Questioning
S1-2: 2 Predicting and Hypothesizing
Next steps
As an extension to this activity, a lesson on snowflakes could be added. Using the book "Snow Crystals" as a reference, students could try to make paper snowflakes that look like the ones in the book. A math connection can be made to the lesson, teaching about lines of symmetry. Using thin strips of paper as lines of symmetry, students can place them on top of the snowflake to figure out where there are lines of symmetry.
Reflections
This experiment worked very well the first time we did it with students.
What was helpful:
It helped to have the snow already out, and to pre-measure it before the students arrived. It also helped to pre-measure the other materials. Labeling the spoons that were used to stir in the materials was a life-saver, as was labeling the table where each cup of snow went.
Previous knowledge students brought:
Many students already knew what liquids and solids were. They were able to give examples of both, which demonstrated their understanding of the two things. Many students also knew how to make a hypothesis, and record observations. This was helpful in their understanding of how to fill out the handout.
Unexpected:
We did not anticipate the long length of time it would take for the snow to melt. The students were waiting 10 minutes at times for the snow to melt. They did not find that fun or interesting. It is difficult to keep them occupied and making observations when they need to wait that long.
Suggestions:
We recommend that you label each individual cup, as it can be confusing trying to figure out which material is which. We also suggest that a about 75mL of snow is used to test, rather than 100mL, because it melts faster, and the students are able to see a reaction to the materials more quickly. This makes the experiment more exciting for them!
Must do:
It is an absolute must that a nail is put in the middle of the snow so that the amount of time it takes the snow to melt can be measured! This adds a math component to the lesson, which would otherwise not be a part of it.
Citations and links
Link to the Grade Level Expectations [1]
| Work in progress, expect frequent changes. Help and feedback is welcome. See discussion page. |


